Deep Learning in the Cloud
Amazon Web Services. Training and evaluating deep neural networks is a computationally intensive task. Unfortunately, this problem isn’t confined to deep neural networks. Natural language processing tasks can require processing large sparse word vector matrices that can take too many of a computer’s resources to process in a reasonable amount of time. Indeed due to the complexity of tuning many of these processes as well as feature engineering, we may need to run many different variations of a pipeline to get adequate results. Unless you’ve invested in your own gpu machine learning compute rig, the only available option is to set up a remote gpu cloud compute instance. This post will cover Amazon Web Services Elastic Cloud Compute (EC2) as this was the cheaper option when I initially explored whether to go with AWS or Google Cloud.
This post consolidates several other posts on this topic, but is mostly a note to myself to remember how to do it. Getting an EC2 gpu compute instance (p2.xlarge) is fairly straightforward, but setting up Keras with the Tensorflow gpu compute backend was pretty involved since it needs to built from source and you need to transfer the Nvidia Cudo Toolkit and CUDNN libraries over to the instance.
To avoid all of this,there is a Deep Learning Amazon Machine Instance that’s free to launch instances from, which has nearly every deep learning framework that’s currently available. This simply a much easier way to go and takes a lot less time. They also similar deep learning AMIs that have source code on them, so if you really want to you can build out your framework yourself. Additionally, I discovered a few other tweaks that made using Jupyter easier as well, making sure the gpu is firing on all cylinders. When it’s all said and done, I’ve found speed-ups training CNNs of 5 to 10 times over my little gpu on my windows machine and even more over my laptop.
1 - Sign-up/in.

Visit aws.amazon.com and sign-up for a free basic support plan. Setting up AWS EC2 for Linux instances is what this guide was created for and it takes a bit of time as there’s a quite a few details for configuring your account, users and access. In the navigation pane for the Amazon Elastic Compute Cloud Documentation I recommend at minimum following the directions in:
before continuing with this guide if you haven’t already.
2 - Change Region.

Once you’re signed into your account, check to see which region you’re in. You should change it to whichever is closest to you, e.g. this guide is set to US East(Ohio) (us-east-2).
3 - Request Limit Increase.
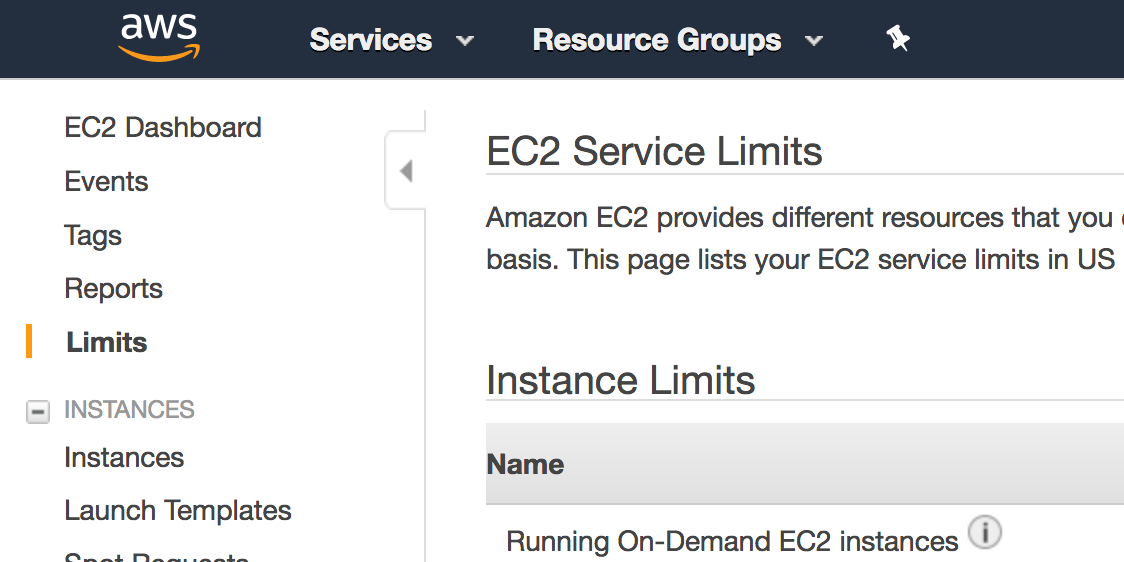
In your EC2 Management Console, navigate to your EC2 Dashboard. In the navigation pane on the left side of the console, choose Limits. In the EC2 Service Limits report and find your “Current Limit” for the p2.xlarge instance type. If your limit of p2.xlarge instances is 0, you’ll need to increase the limit before you can launch an instance. From the EC2 Service Limits page, click on “Request limit increase” next to “p2.xlarge”.
You will not be charged for requesting a limit increase. You will only be charged once you actually launch an instance.

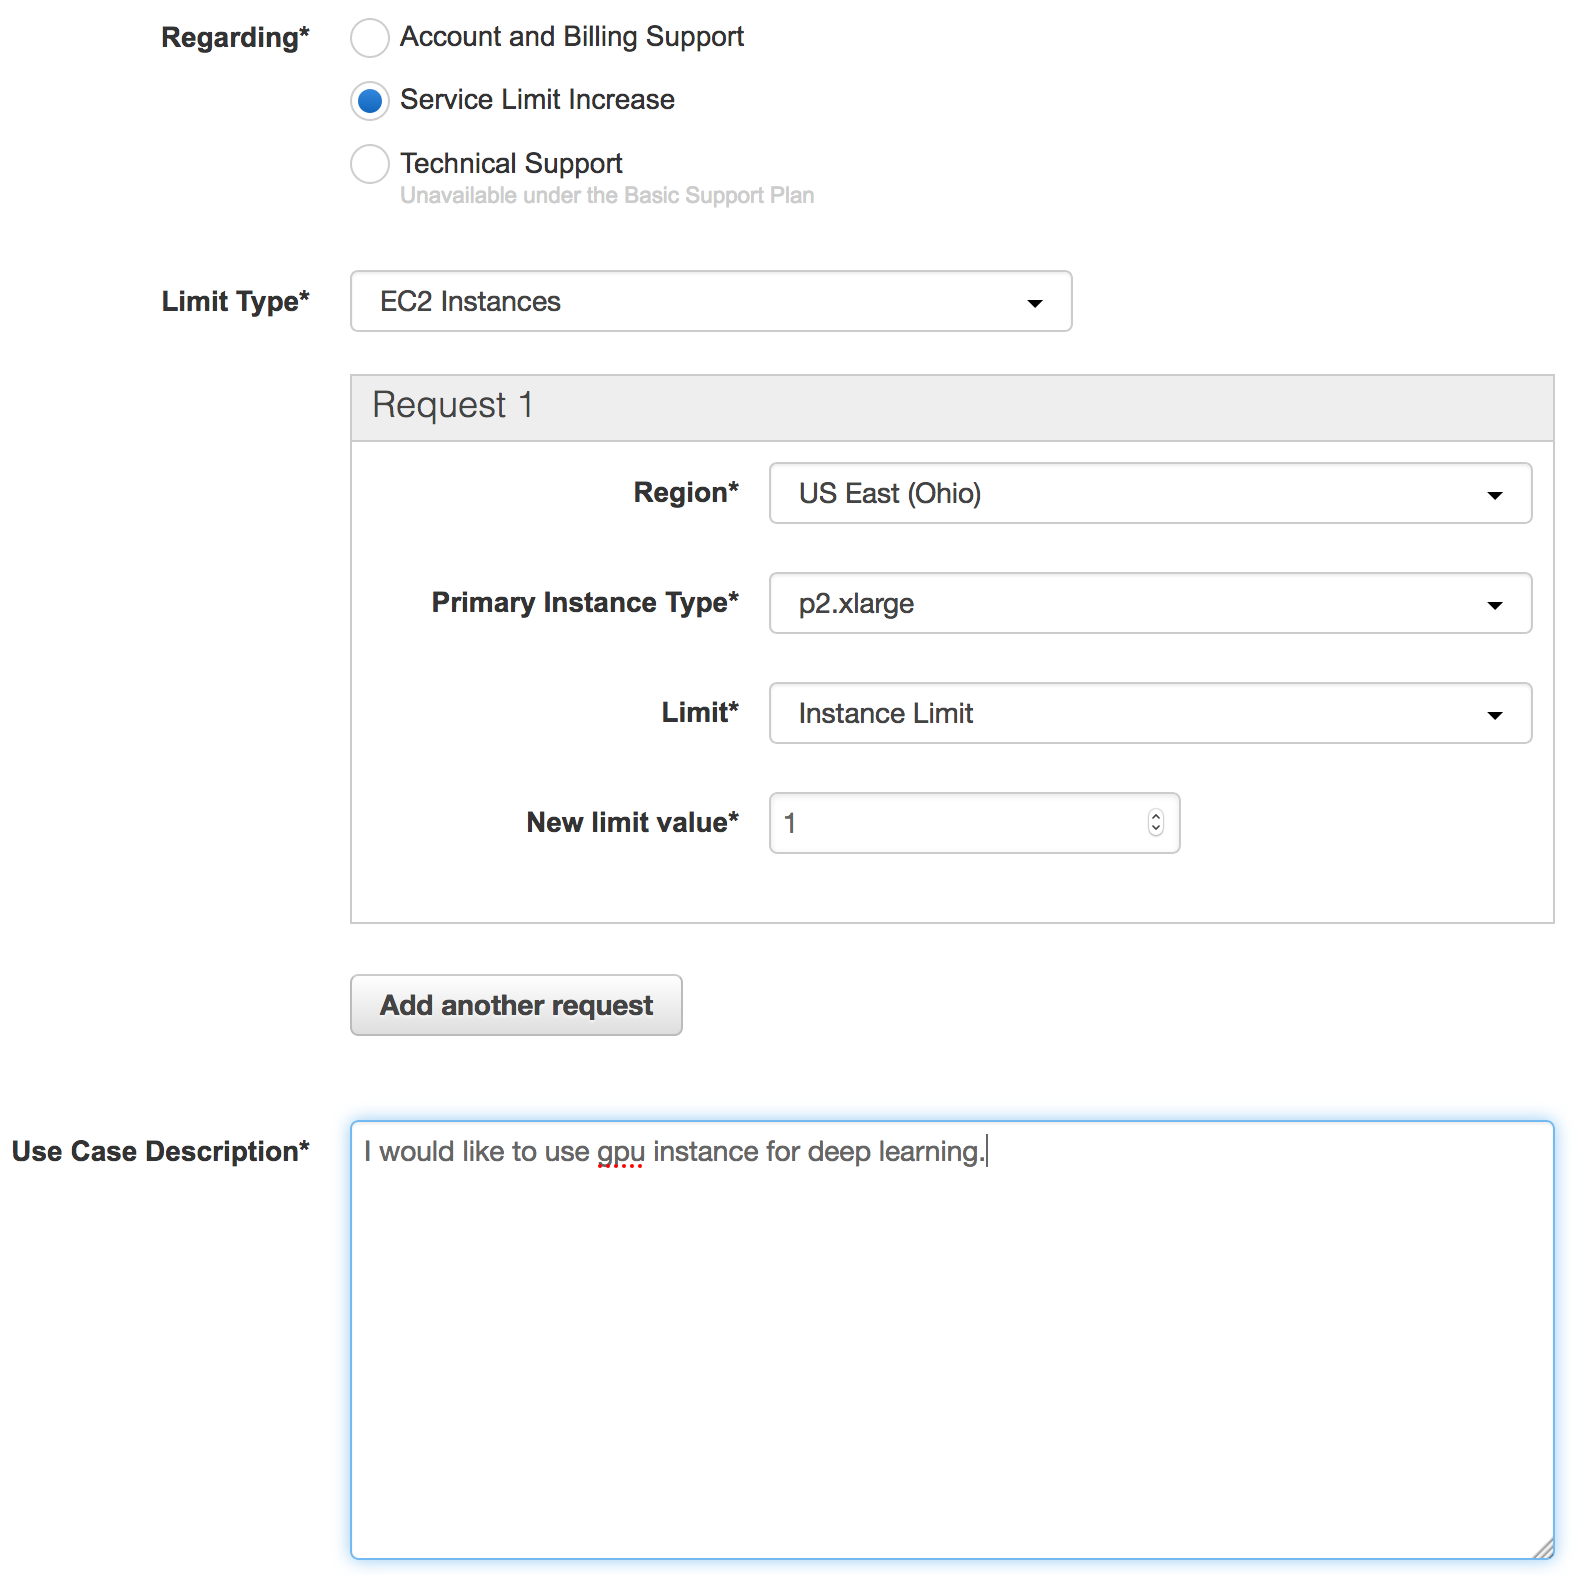
Wait for approval. It can take up to 48 hours to receive approval for your request.
4 - Launch An Instance.

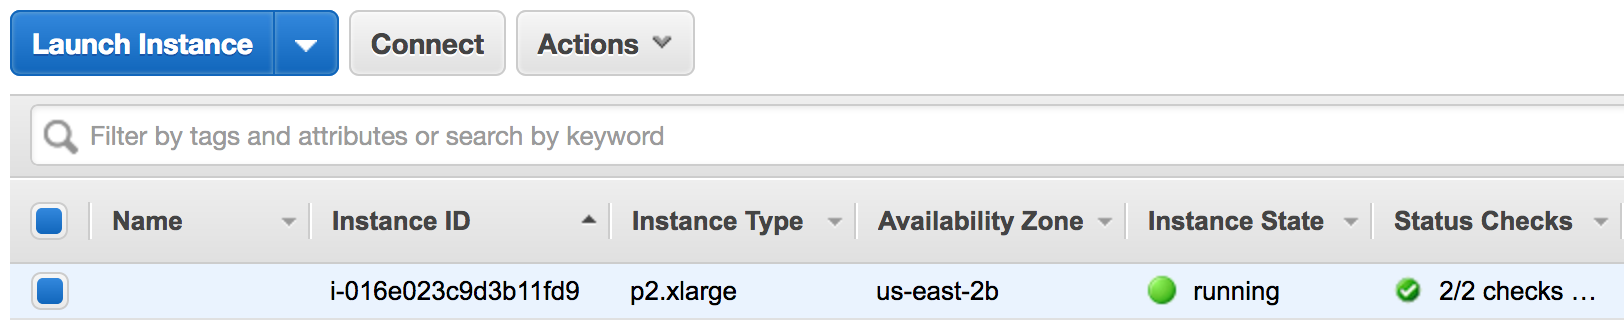
Once AWS approves your GPU Limit Increase Request, you can start the process of launching your instance.
In the navigation pane on the left side of the console, choose Instances, and click on the Launch Instance button.
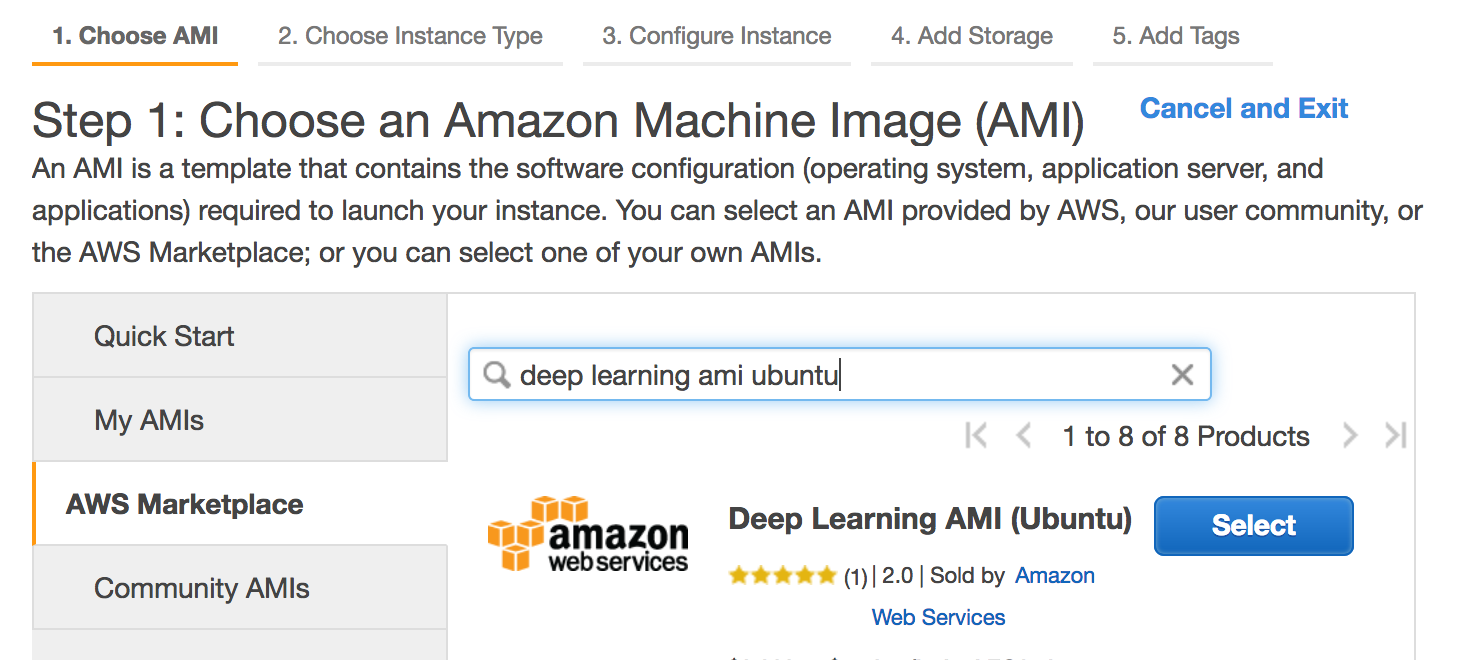
Back in the navigation pane, choose AWS Marketplace and search for “deep learning ami ubuntu” and select it:
After selecting the ami, you’ll be shown a page cataloguing the different charges for using this instance. For GPU compute extra large (p2.xlarge) it just shows that you will be charged $0.90/hr, which is their standard rate. Click continue.
5 - Select Instance Type
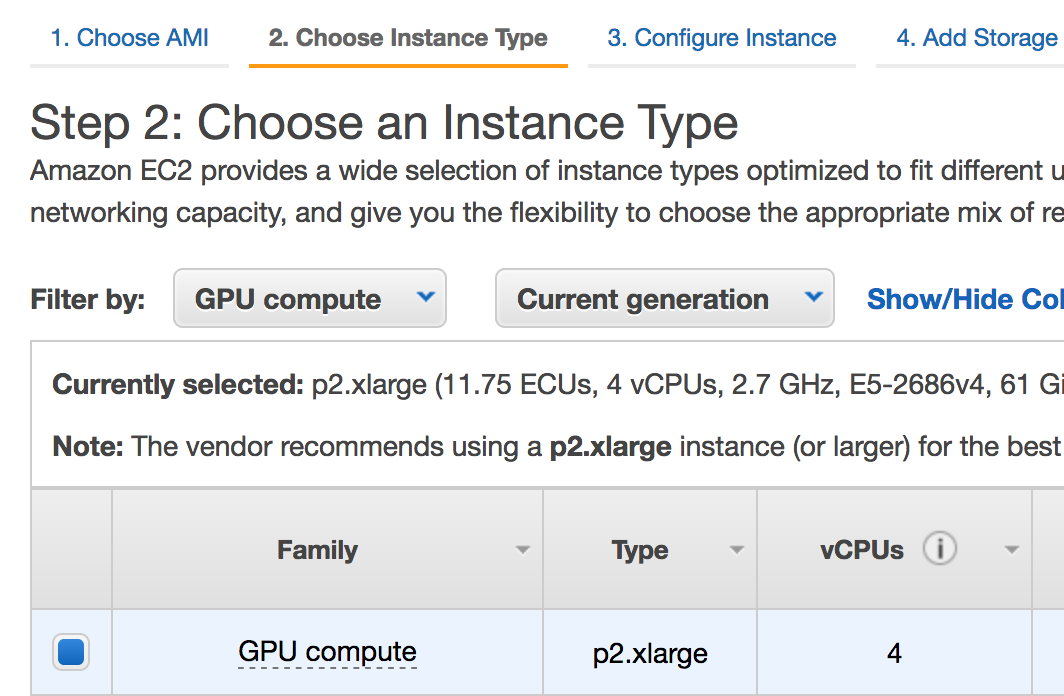
In “Step 2: Choose an Instance Type”, using the “Filter by:” drop-down menu select GPU compute and select the p2.xlarge GPU instance type.
6 - Configure Security Group

In the header, select 6. Configure Security Group. Under the Type column click the Add Rule drop-down menu and select “Custom TCP”. In the Port Range field type 8888. And in the drop-down menu under Source select “Anywhere”. Finally, at the bottom of the page click Review and Launch.
7 - Launch Your Configured Instance
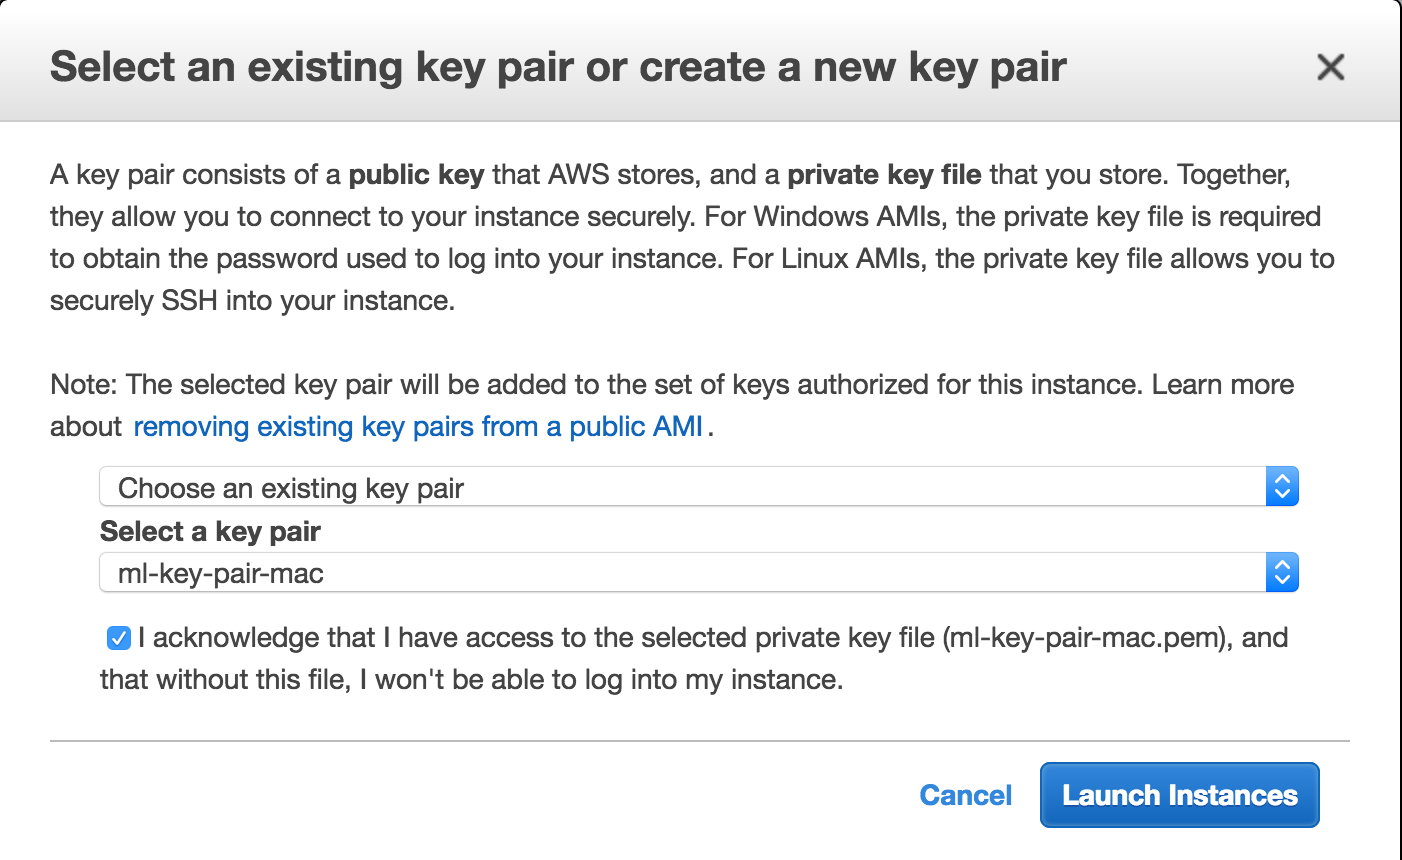
When you click Launch, under Select a key pair choose your key and click Launch Instance.
8 - Connect To Your Running Instance
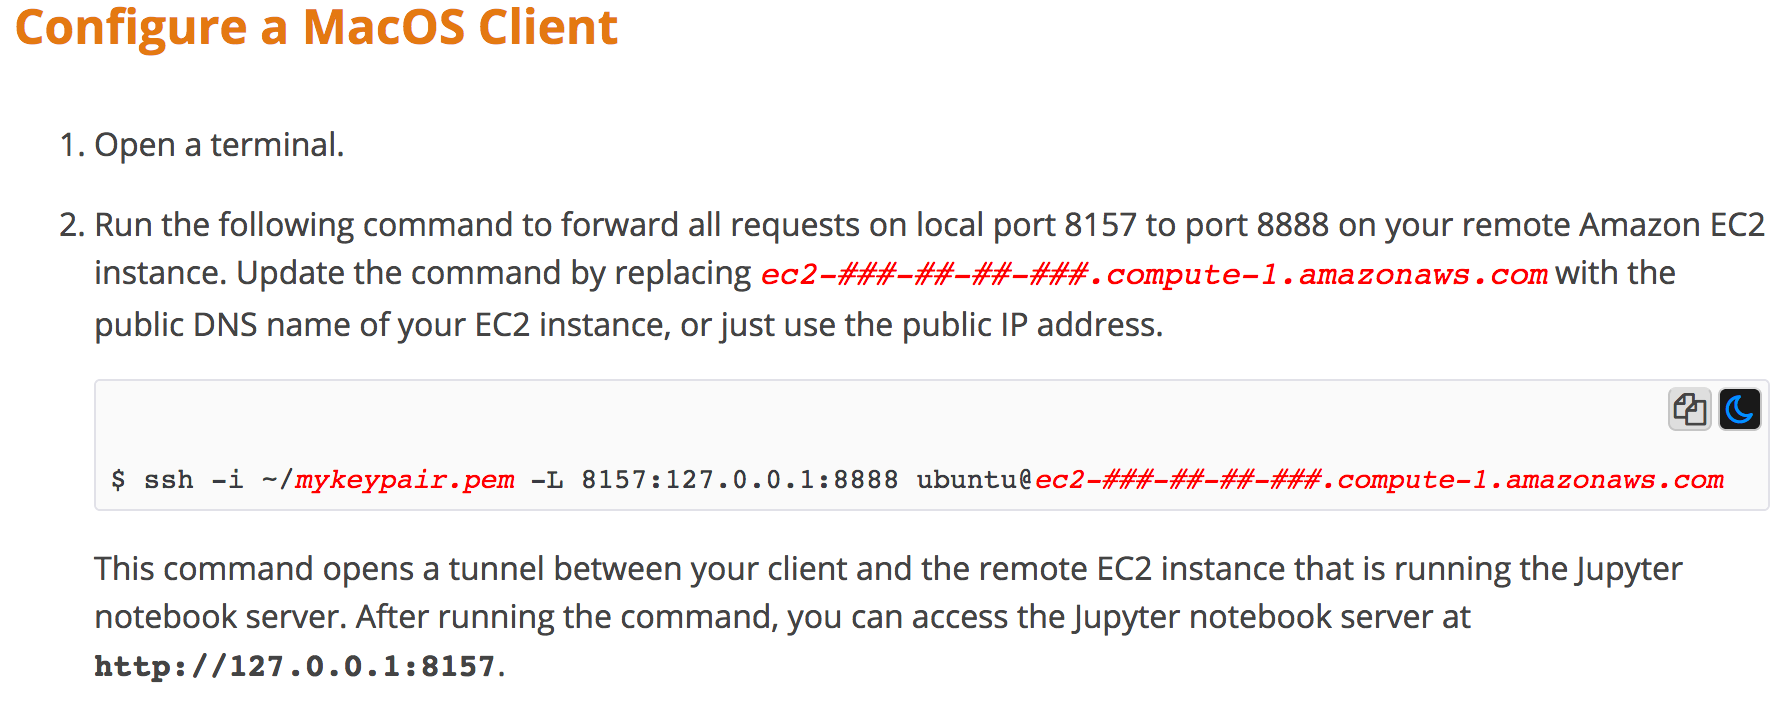
Now that your instance is up and running you need to connect to it. Since we’ll be running Jupyter Notebooks in this instance you’ll want to port-forward the ec2 instance to your local machine. Refer to AWS documentation for Configure the Client to Connect to the Jupyter Server for connection instructions for different OS’s.
The screenshot below shows how to do it for OSX:
9 - Optimize The Instance GPU
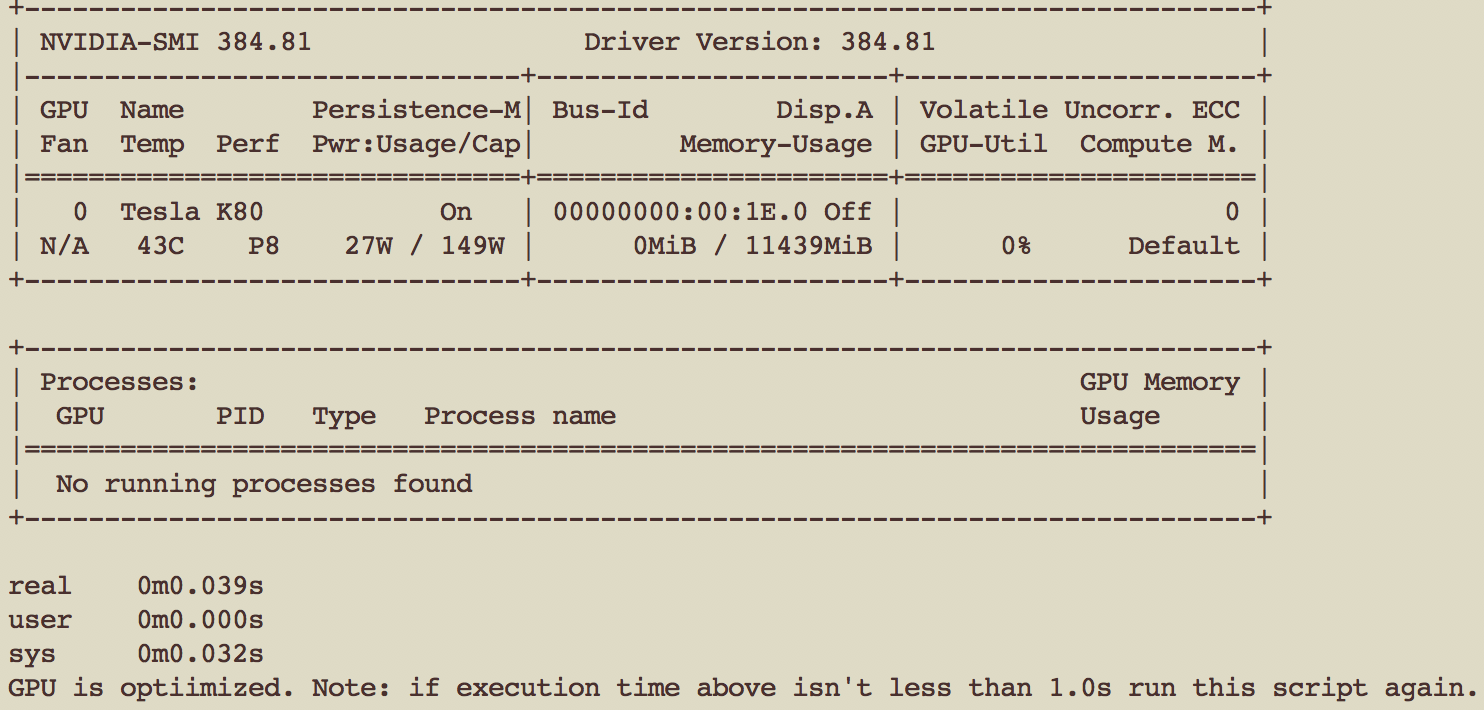
Once you’ve connected, you now need to optimize the GPU. Run the following code in the terminal that is connected to your instance:
wget "https://gist.github.com/m00nd00r/d52df1c881b0f294fa8baa98dbcf01cb/archive/977bffb50b3c4f3acaadadc418d7c1b9d1d9b80b.zip" -O temp.zip; unzip -j temp.zip; rm temp.zip; chmod 555 nvidia-setup.sh; ./nvidia-setup.sh
You can review the above script in the gist I created for it.
This will download a script I wrote to execute several nvidia commands to maximize the GPU performance that is hosted in a gist I created for it. It then executes the script. This script runs a timer to clock how fast the nvidia-smi utility runs. You should see output time to be less than 1 second.
10 - Configure Jupyter
Now that your instance’s GPU is optimized, you’ll need to configure jupyter to run a little more easily. reference: https://docs.aws.amazon.com/dlami/latest/devguide/setup-jupyter-config.html
Run the following code in the terminal that is connected to your instance:
wget "https://gist.github.com/m00nd00r/25657aa82f968d5ebe82fd5f33a55bc5/archive/86de1b1867c68e089b5647555dcfdb2fec9029e8.zip" -O temp.zip; unzip -j temp.zip; rm temp.zip; chmod 555 jupyter-setup.sh; ./jupyter-setup.sh
You can review the above script in the gist I created for it.
Similar to optimizing the GPU, the above code downloads, unzips and runs a script that will set-up your jupyter config file. When you execute the above line of code in your instance it will prompt you to create a password to login to jupyter. It will then ask you to verify the password. Either enter a password or just press enter if you don’t want one. Either way you’ll need to enter the same at the Jupyter login page. Then wait for it to execute - don’t type anything, it takes a moment.

It will then ask you if you want overwrite the default config file. Type y and enter. It will finish configuring jupyter for you. Then you’re ready open a notebook and get started.

11 - Start A Notebook
Simply type in your instance terminal window:
jupyter notebook
and it will run through it’s normal sequence.
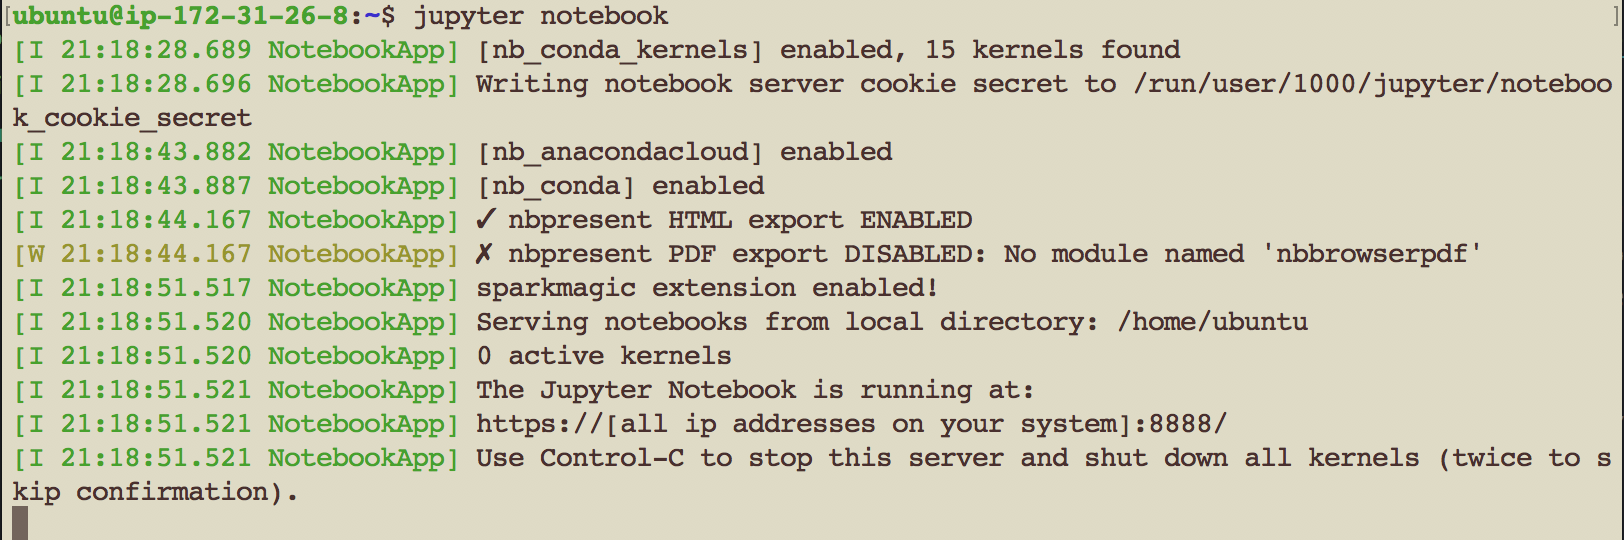
When you see the screen above, type https://127.0.0.1:8157 into your browser. Initially you’ll see the following warning:
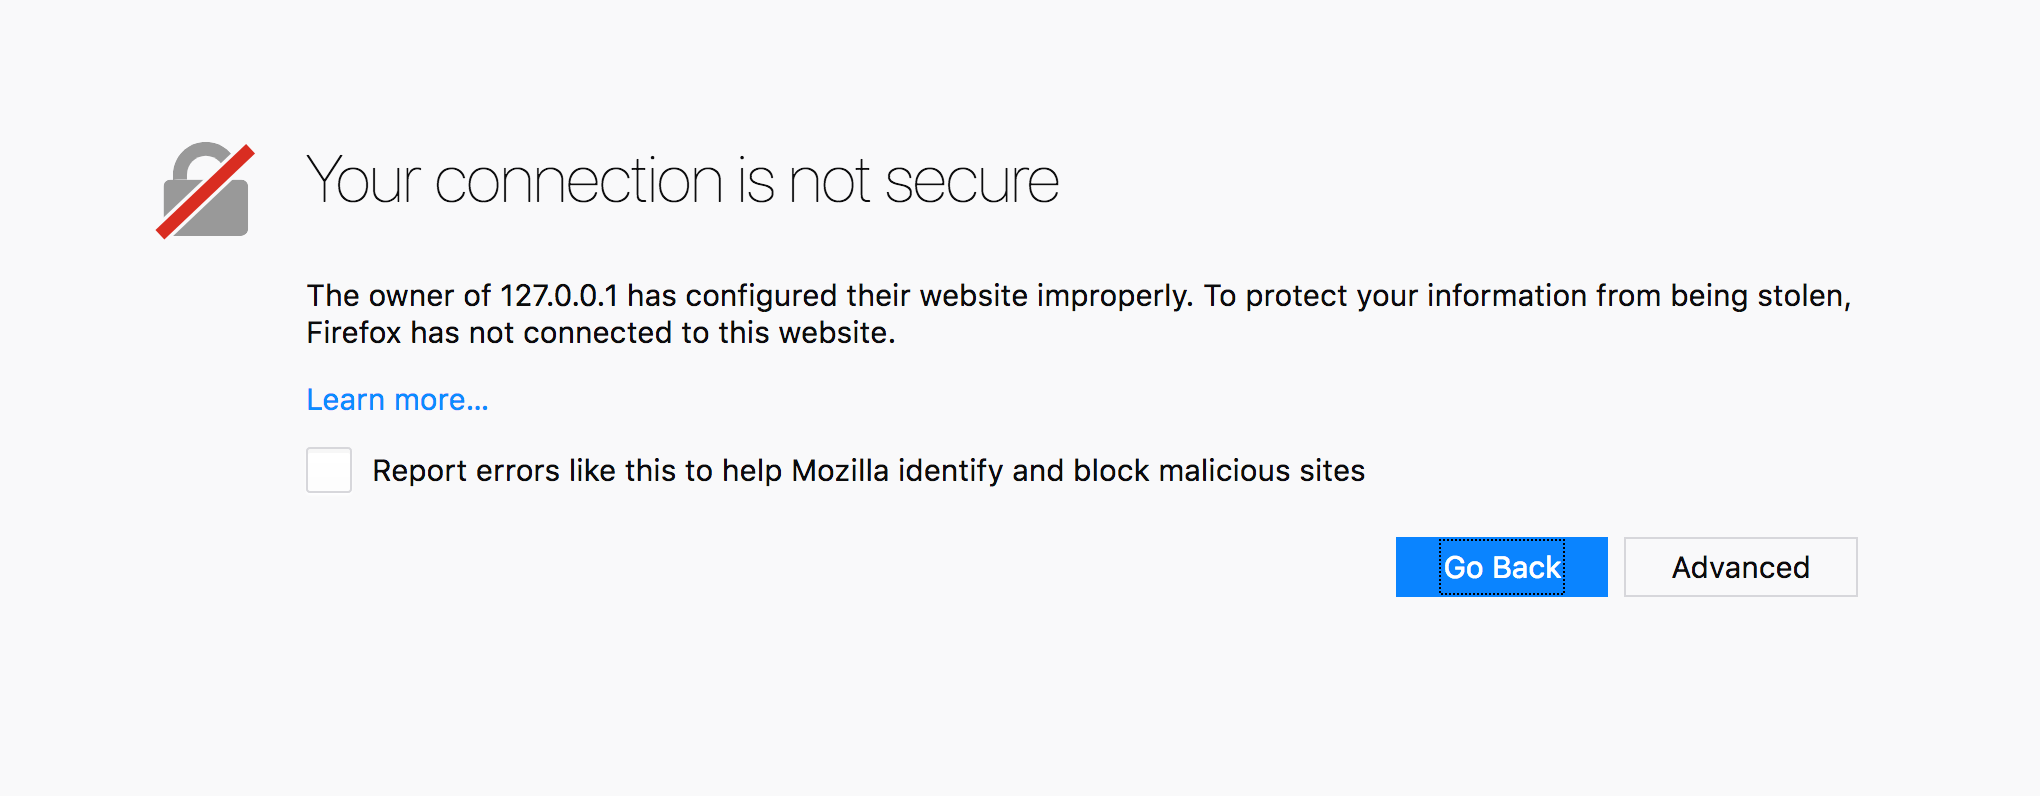
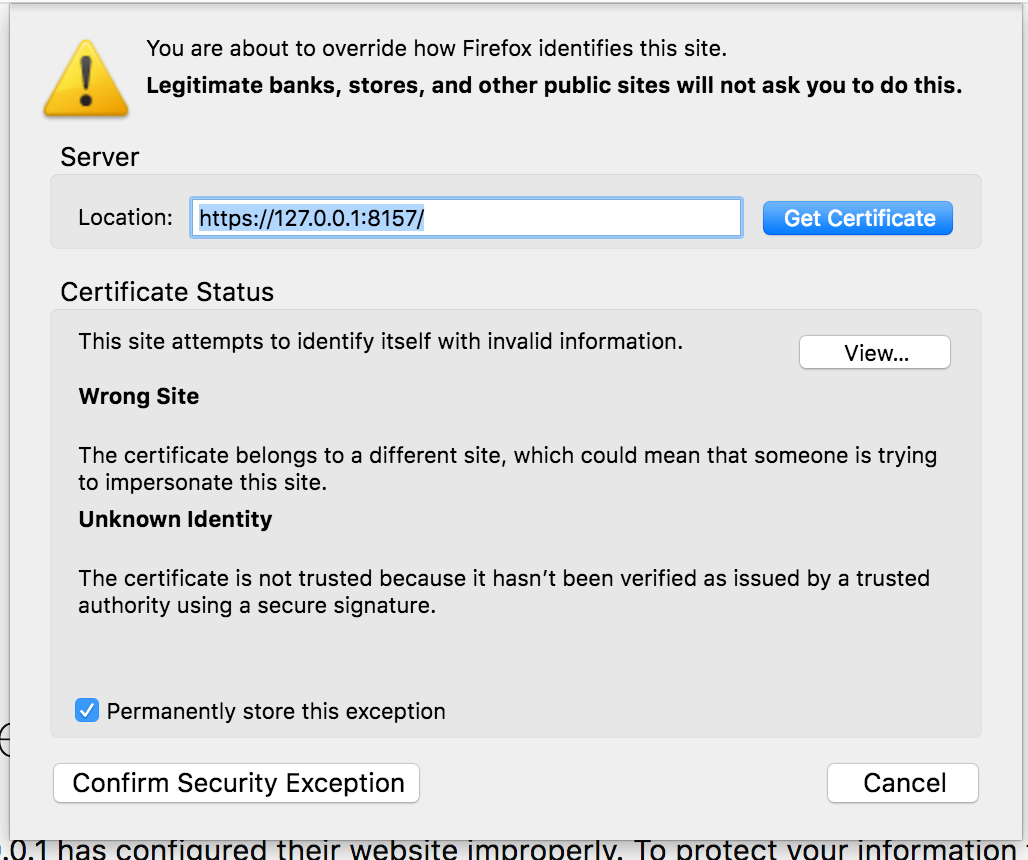
Click the “Advanced” button and you will see:

Click “Add Exception…” and you will see:
Click “Confirm Securtiy Exception” and you will see the jupyter login page:
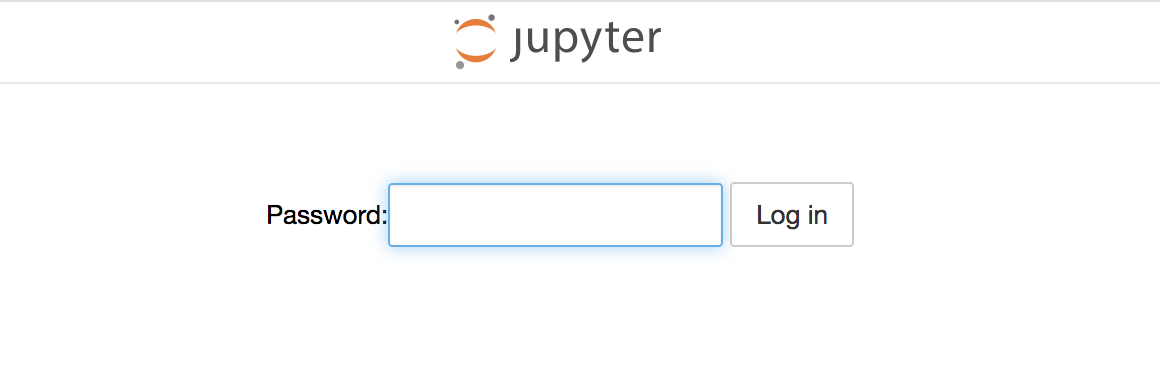
Now enter your password or press enter and that’s it! You’re in!
Happy Computing!